
I’ve noticed recently that a lot of websites give information about swarming bees, but most do it in vague terms, assuming that the person doing the swarm is knowledgeable about one way already, or using names for swarm methods without explaining in any detail how they work.
As a beginner I had to spend a lot of time with books spread across the table, drawing pictures to properly understand how to do even the simplest of swarm methods - the Pagden swarm. As a result I thought I’d write it all out step by step here to make it easier for anyone else trying to split their beehives for increase.
Why do I want an artificial split/swarm?
If you don’t, your bees will run out of space, and the old queen will leave with most of the flying bees - up to 50% of the hive and 100% of your honey-gathering bees. Any new queens which hatch won’t be laying eggs for another 4 weeks, so your colony stagnates and doesn’t get any bigger or better stocked. New queens might also decide to swarm (a cast), further depleting your hive of bees, and lessening its chances of making it through the winter.
There’s also the fact that you’ll get 2 colonies out of 1 - which doubles your stock if you’re wanting to increase, or gives you a valuable asset to sell on in these times of bee shortages!
When do I do this?
Over the late spring and summer months you want to be inspecting your bees every 9 days - a week is ideal. This is because 9 days is the period from the bees deciding they want to swarm to actually leaving, meaning if they’re planning to go, you’ll see it coming.
During an inspection you’ll see a proliferation of queen cells, usually along the bottoms of frames, with eggs, larvae or a milky-white layer of royal jelly. They’re getting ready to leave!
Why Pagden? Why not another technique I’ve read about?
Use Pagden because its simple, and it works. Once you’re comfortable with this technique, by all means branch out, but don’t risk trying something complicated or involved, only to get out of your depth and end up worse off than when you started.
What do I need?
One requirement of the pagden method is that you have found and marked your queen, as you need to separate her out from the rest of the colony.
As well as your existing colony, you’ll need all the kit for a second colony:
-
Floor
-
Brood box with undrawn or drawn frames
-
coverboard and roof
You’ll also find the following tools useful:
-
Bee brush or large feather
-
Smoker
-
Cover cloths
-
Queen marking cage (not essential, but very handy!)
How it works
The swarming instinct is driven by the flying bees, not by the queen. when they feel the hive is too full they’ll want to leave, and will take the old queen with them.
Pagden works by separating the flying bees and queen from the brood and nurse bees - this tricks the flying bees into thinking they’ve swarmed, and the swarming instinct is suppressed.
Since the flying bees have a homing instinct to keep returning to the current hive site, they must be left here with the queen. The nurse bees and brood are moved to a new site (when they begin flying they will home to the new location).
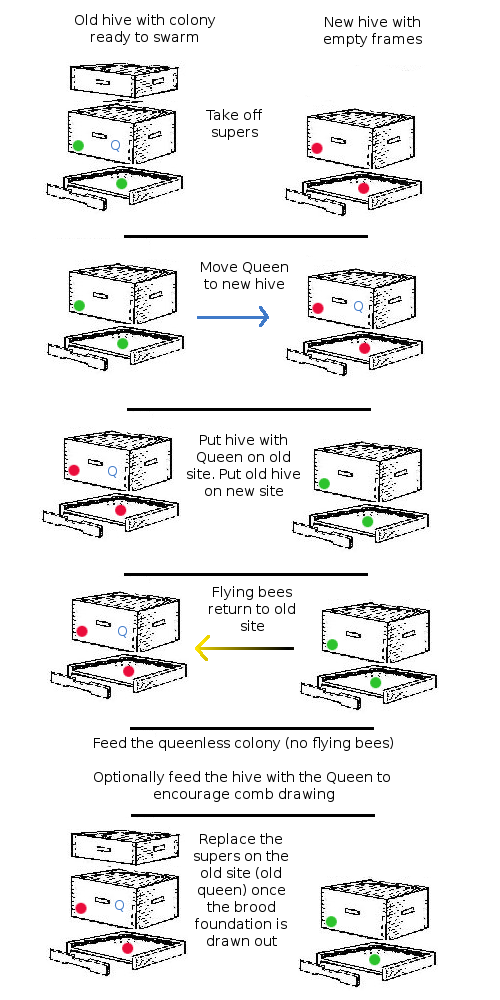
Procedure
Artificial swarms are about as invasive a procedure as you can carry out - removing every frame, inspecting it thoroughly for queen cells, then removing the queen. Make sure you smoke the bees well before you start, and use cover cloths/cover boards whenever you are working to keep the colonies inside and prevent most of them ending up in the air around you as you work!
-
Choose and prepare a site for your new hive.
-
Get all your equipment ready next to the old hive.
-
Take a few frames out of the new hive and put them to one side.
-
Go through the old hive and find the queen - trap her on a frame with the marking cage and move that frame to the new hive box.
-
Move a full frame of stores to this new hive as well.
-
Move the old hive box (without queen) to the new site.
-
Put the new hive (with queen and undrawn frames) onto the old site.
-
Destroy all but the strongest looking queen cell - this ensures you won’t get casts.
-
The flying bees will leave the new site and return to the old one to join the queen.
-
Feed the new site (they have no flying bees, so won’t be bringing in stores) and optionally feed the old site, especially if they are on undrawn frames as this will speed up their drawing.
-
Put any supers and queen excluder on the old site.
[1]. If you can, old hive off its usual site and put the new hive there before you begin. This way the flying bees will begin to occupy the new hive immediately, keeping them out of your way and making it easier to find the queen in the old hive before you transfer her across.
Things to note
Be aware that if there are stores in the supers the bees will use these up in drawing out wax, so you can leave the supers off for a few days until the foundation is being well drawn out.
If you don’t destroy all but one queen cell in the new site, the first queen to emerge may leave with any bees that have progressed to flying bees in a cast swarm.
Leave the new site completely alone for at least 3-4 weeks to allow the new queen to hatch, mate and begin laying in peace.
If after 5-6 weeks there are no sign of eggs or brood in the new site, transfer in a frame of eggs from the old site. If they have lost their queen, they’ll start building new queen cells with these eggs (in which case wait another 4 weeks and check back). If they ignore them, then the queen is fine and just being slow to start.
