
We recently acquired some Dell PowerEdge servers (r410 and r510) at work and I wanted to try playing around with IPMI to see if this is a useful tool to add to our armoury. Turns out it is very useful indeed. Not only do we get access to ‘chassis-level’ information (power states, sensor information etc) we can configure Serial over LAN with Console Redirection to get remote access to the boot screens, BIOS etc.
Setting up IPMI
-
On Boot, press Ctrl-E when prompted.
-
Set IPMI Enabled
-
Set a static IP address and gateway.
-
Set a username (usually root) and a password.
-
Reboot and go into the BIOS (F2)
-
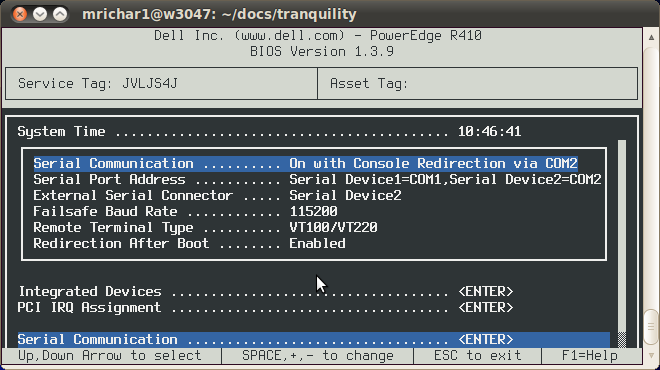
Go to the Serial Communications menu
-
Change to On with Console Redirection via COM2
-
Set the External Serial Connector to COM1
-
Enable Redirection after Boot
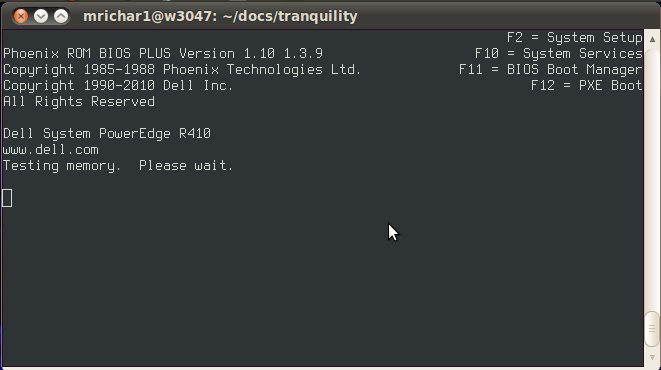
You should now have the console being redirected to COM2 - a virtual serial port being provided by the IPMI controller.
Now its time to connect to the server remotely.
-
On a client install ipmitool
-
Run:
ipmitool -I lanplus -H server -U root -a shell- Enter the password as set above.
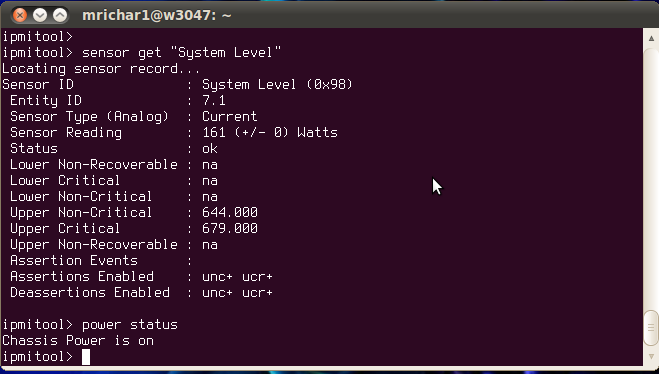
You should now have access to the IPMI shell. Type help to see the available commands. Useful ones include power, delloem, and sensor.
If you need to access ipmitool via a script, simply add the command you wish to run on the end in place of ‘shell’. To send the password for scripts, remove the -a option and either use -E and set the environment variable IPMI_PASSWORD or use -f passwd.txt
See man ipmitool for more details.
If you are using scripts to query your system, it is a good idea to create a new user without admin privileges - that way if the account is compromised a remote attacker can’t power cycle your server! To add a new account (unprivileged), run the following ipmi shell commands:
-
user list (choose the next free number for the ID below)
-
_user set name ID NEWUSER
user set password ID PASSWORD
user enable ID
channel setaccess 1 ID privilege=2
_
Note: It appears on most systems, you still have to give at least OPERATOR (3) level privilege to accounts before they can do anything useful though…
For more IPMI options, look at the followin guseful reference:
Setting up Serial over LAN (SOL)
Note: Windows names serial ports COM1, COM2 etc, on linux they are usually named ttyS0, ttyS1 etc. Here we are using the second serial port on the system - named COM2 in the Dell BIOS, and ttyS1 in Linux.
To view the serial console via IPMI on the client, run sol activate in the shell as above.
You should now be able to access the BIOS screens etc and edit the BIOS or other system settings at this point.
To set up a serial console for Linux, you need to do the following:
-
Edit /boot/grub/menu.lst
-
Add the lines:
serial –unit=1 –speed=115200
terminal timeout=5 serial console -
To the kernel boot line, add the options:
console=ttyS1,115200n8 console=tty0
When you now reboot and activate the sol console, you should see both the grub menu (and make different selections if necessary) and the full boot process of the OS, as well as providing you with a login prompt at the end. Note that the timeout=5 option will present the message ‘press any key to continue’ on both consoles for 5 seconds to allow that console to gain control of grub.
Note: If you want root to be able to log in on the sol console as root, you will need to edit /etc/securetty and add ttyS1 to the list.
