One of the many leather projects I’ve been working on is shoe-making, and I thought I’d post up a quick ‘howto’ on the process involved. Once I’ve finished this project I’ll edit this post to include some photos of the process.
This does of course assume that you have some basic knowledge of leatherworking - if not then I can heartily recommend The Leatherworking Handbook by Valerie Michael as an excellent starting point.
General Advice
-
Use 2.5mm leather - this gives a good mid-point between strength and durability and flexibility for sewing and wearing.
-
DON’T get the leather wet - wet leather goes hard and stiff and will kill your feet. Be sure to treat the finished shoes with something like neatsfoot oil, or dubbin or beeswax polish to protect them.
-
All stitching on the shoe is saddle stitch with 2 needles, but using either box or butt stitch, depending on the type of seam required.
Template
-
Wrap your right foot in a plastic supermarket bag. Cover with gaffer or parcel tape, making sure to begin with 2 rings round sole to hold basic shape. Round off the toe section with more tape, then cut a front slit on top of foot until you can slip your foot in and out easily
-
Cut a vertical line down inside edge at ankle point.
-
Cut around the edge where the sole joins the sides - either just enough to flatten if using 1 piece of leather, or all the way if using a separate sole.
-
Trace onto the leather and cut out - flip over and cut again for other foot
Stitching
Begin joining at the toe - working back towards the heel in both directions, alternating from time to time to get an even finish. Keep testing it on your foot as you go.
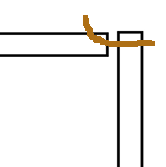
To join the sole to the side you need to ‘box stitch’. Hold sole at 90degrees to side - rough side pointing ‘outwards’ on both pieces. Stitch straight through the edge piece, into the side of the sole piece, and out the rough side. This means that the stitiches will be hidden when the shoe is turned inside out, and the rough leather will be inside the shoe.
Once you have gone all the way round the sole, you will have the vertical cut to stitch. Turn the shoe inside out now - if its difficult, you’ll have to stitch this last vertical seam on the inside of the shoe - if it was easy, turn it back to being rough-side out for stitching.
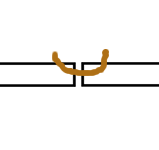
Butt stitch (needle in through edge of leather seam, out through rough side on both sides) so that the stitch is hidden inside the shoe, all the way up.
Test the shoe for fit. If necessary extend the front slit over the top of the foot to allow easy access. Finish off by threading some thonging into slits across this to allow lacing up the shoe.
Now you’ll need to treat the leather appropriately before wearing. Some people find a flat sole does strange things to their posture and balance - in which case you should get hold of some posture inserts to put inside whilst you’re wearing them!
