
Now that I have a garden, and faced with an ever-growing amount of household fruit and vegetable waste, it seemed like a good time to get hold of a wormery.
Wormeries are a composting method which uses small worms (tiger, brandling and dendrobaena) to break down vegetable matter into compost. They do it quickly too - consuming half their body weight each day, and turning vegetables into soil in as little as 6-8 weeks. They also produce a nutrient-rich liquid which makes a great booster for your garden plants.
You can buy wormeries online, but they’re often quite expensive, but all you actually need is a way to layer the vegetable matter and worms so that they can keep working up through the pile, leaving soil to collect at the bottom.
The following design is cheap, simple and easy to make - and should be easy to use and keep your worms happy.
You will Need
A drill with 2 drill bits - 6 or 7mm (1/4-inch) and 1 or 2mm (1/16 inch)
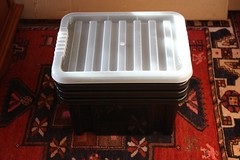
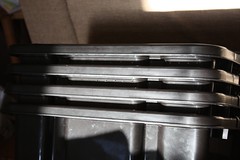
4 Plastic Storage Crates with at least 1 lid - ideally ones that can be ‘slid’ or ‘stacked’ when rotated. You probably want at least 24 litre crates, or your wormery will become very full quite quickly!
Making the Wormery
-
Put one of the boxes off to one side untouched - this will be your base box in which the liquid nutrient collects.
-
Drill 20-30 6-7mm holes in the base of the other 3 boxes - this allows the worms, compost and liquid to travel between boxes.
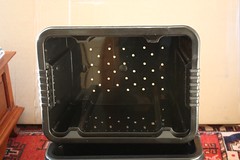
- Drill a number of 1-2mm holes around the edge of these 3 crates at a level that they remain exposed when the crates are slid together - these provide ventilation to the stack.
Getting your Worms
Worms can be sourced from a number of places online - however there are 2 cheap and simple options:
-
Ask on an exchange network such as Freegle - wormeries keep breeding more worms, and most owners will be happy to pass on a number of worms to seed your wormery.
-
Fishing shops sell worms for bait - ask for ‘brandling worms’ or ‘redworms’ as these are the ones you need (earthworms are a different type of worm, and don’t like the conditions in wormeries). You will need around 100 to 500 worms (around 25-100g) to begin with.
Adding the Worms
- Place one of the ‘drilled’ boxes into the ‘drainage’ box
-
Shred a load of newspaper into strips - soak in water and wring out.
-
Place a sheet of newspaper over the holes (to stop the worms falling through) and add the shredded paper.
-
Throw in a few handfuls of compost or soil to help the worms digest the paper.
-
Add the worms to this damp newspaper layer, and cover with a second drilled box and lid.
-
Leave for 24 hours to let them accimatise.
Using the Wormery
-
Place vegetable matter into the empty top box, cover with a sheet of damp cardboard and the lid to block out daylight. (Begin adding waste slowly at first, til the worm numbers increase - not more than around half the weight of worms in vegetable matter per day).
-
Keep adding more vegetable matter to this layer - the worms will come up into it and begin digesting it.
-
When this box is half full, add the 3rd box and start putting vegetable matter into this level instead. This should encourage the worms into the 2 top boxes.
-
When the top box is half full, you should find that the bottom layer has mostly become soil. Take it out, empty it out (picking out any remaining worms and putting them back into the ‘new’ bottom layer) and use the compost
-
Remember to keep draining off any liquid that collects in the drainage box and using it on your plants, diluted 1 part to 10 parts water.
Suitable Waste for a Wormery
The following items are all suitable for a wormery:
-
Fruit and Vegetable Scraps
-
Garden Cuttings & Weeds (but avoid seeds)
-
Leaf litter
-
Newspaper & Cardboard
-
Tea & Coffee Grounds
-
Stale Bread
-
Egg Shells (help neutralise excess acidity)
-
Vacuum Dust & Hair
You should avoid the following:
-
Meat & Fish
-
Dairy Products
-
Hard wood chips (take too long to decompose)
-
Acidic Foods (too much citrus or onion)
-
Grass (in large quantities)
-
Diseased plant material or weed seeds
-
Pet Waste
Problems
Your worms are happiest in an environment between 8 and 30C - if it becomes colder than this the worms will become inactive and stop breaking down the waste. In order to avoid this, overwinter your wormery in a shed or garage to keep the worms active, possibly insulating it with carpet or foam to trap in the heat.
If your wormery appears to becoming too wet and sludgy, the worms will be less likely to work well. In this case, add more shredded paper or cardboard to dry it out, optionally adding small amounts of bonfire ash to reduce the acidity of the mix.
You may find fruit flies take up residence in your wormery waste - these don’t cause any harm (and actually help break down the vegetable matter into compost), but if annoying can be reduced/got rid of by making sure the lid is tight-fitting and keeping the vegetable layer snugly covered with a sheet of damp newspaper.
