Origami Envelopes

I’m a big fan of practical origami - especially for things that are useful in a day-to-day kinda way, rather than a ‘this is awesome, but I’ll forget it by next month as I never used it’ design.

To this end I have found 2 designs for envelopes that I use a lot - why two? you might ask Well, one is folded from a square, the other from a rectangle - one is more of an envelope, while the other is more of a way of turning a letter_into_ an envelope.

I’m always interested in hearing about new ‘practical folds’ such as these that you can use everyday - if you know of any good ones, please let me know!

Read more...

Simple Winter Feeding with Sugar Bags

I’ve been using a ‘traditional’ technique for ensuring my bees have enough ‘backup’ stores over winter, using nothing more than 1kg sugar bags. I first heard of this technique while perusing an article on overwintering bees from the Dunfermline and West Fife Beekeeper’s Association, and through a bit of trial and error have come up with my own two methods of using it.

Winter Method

Take a 1kg paper-wrapped sugar bag and immerse the entire bag in a bucket of water for around 20-30 seconds, turning and squeezing gently to allow any trapped air to escape and for water to enter the bag. Lift the bag out very carefully (the wet paper can tear easily) and place somewhere undisturbed in the warm to dry (on top of a radiator or on a rack in an airing cupboard is best). The bags will dry out and form a hard crust like a giant sugar cube in a day or two.

To use, simply cut a few holes in one side of the bag, with a knife or hive tool, big enough to allow the bees access (but not so big that the sugar can fall through onto the colony) and place directly onto the frames, surrounded by an eke or empty super to lift the cover board and roof. (Optionally with some insulation put into the empty space to prevent heat loss.

Early Spring Method

As above, but instead of leaving the bag to dry out, instead drip-dry and place directly onto the cover board for the bees to feed on. The wetness means this is half way towards a spring syrup feed, which will encourage the bees.

(This method can be used in the middle of winter too, but care must be taken that the water in the bags doesn’t cause cold and damp problems for the bees).

In both cases I put 2, 1kg bags into each hive, as this allows you to cover all the frames with some of the bag, meaning the bees can always use it as a bridge, preventing isolation starvation.

Any sugar left in the bags after winter can be taken and used to make syrup for spring feeding.

Read more...

Using ps in scripts

Not an amazing revelation, but something I keep using, then forgetting how to do, and then having to look it up again, so this is more of a mental ‘post-it note’ than a proper blog entry…

ps --no-headers -eo user,comm,pcpu,vsize,nice | sort -k 4 -r -n

There’s a whole range of fields that can be requested from ps - see the man pages for details.

Read more...

Making your own Wormery

Now that I have a garden, and faced with an ever-growing amount of household fruit and vegetable waste, it seemed like a good time to get hold of a wormery.

Wormeries are a composting method which uses small worms (tiger, brandling and dendrobaena) to break down vegetable matter into compost. They do it quickly too - consuming half their body weight each day, and turning vegetables into soil in as little as 6-8 weeks. They also produce a nutrient-rich liquid which makes a great booster for your garden plants.

You can buy wormeries online, but they’re often quite expensive, but all you actually need is a way to layer the vegetable matter and worms so that they can keep working up through the pile, leaving soil to collect at the bottom.

The following design is cheap, simple and easy to make - and should be easy to use and keep your worms happy.

You will Need

A drill with 2 drill bits - 6 or 7mm (1/4-inch) and 1 or 2mm (1/16 inch)
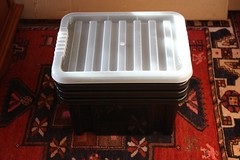
Wormery Crates
4 Plastic Storage Crates with at least 1 lid - ideally ones that can be ‘slid’ or ‘stacked’ when rotated. You probably want at least 24 litre crates, or your wormery will become very full quite quickly!

Making the Wormery

Read more...

Beeswax Polish

I’m always amazed at the price of beeswax furniture polish in hardware shops, and the vast range of complicated ingredients they contain. I use beeswax polish for a variety of tasks - furniture, leatherwork, even shoes - and wanted something simple and cheap to make, without too many odd ingredients.

The following recipe is an old one - probably dating back to medieval times. The ingredients are standard, only the quantities change, depending on what you want your polish to be like.

Ingredients
Linseed Oil - a waterproof, penetrating oil, which soaks into the wood and prevents denting and scratching.
Beeswax - a tough wax with high sheen and a high melting point.
Turpentine - distilled pine resin - a wood-based solvent in which to dissolve the wax and oil
Essential Oil (optional - add a scent other than turpentine)

Recipe

Read more...

Apple Wine without a Fruit Press

Apple wine is something that a lot of people always do a double-take when I mention it - usually quickly followed by the question ‘don’t you mean cider?’ Which of course I don’t - apple wine is a very different drink - usually sweeter, stronger, and yet a subtler flavour - not as sharp or refreshing as cider, but a pleasant drink to be sipped instead of quaffed.

My recipe for apple wine is nice and simple in that it needs no fruit press or juice extraction - the natural action of the yeast and enzymes gets all the flavour out of the fruit with minimal effort, as well as out-competing any other bugs that might be trying to get a foothold on the fruit.

Of course, apples are one of those free foods that are easy to come by - either scrumped from unsuspecting gardens, or donated by those with a glut of fruit that aren’t quite nice enough for eating. Crab apples can work well in wine too, though its good to balance up these with some regular apples to avoid too much sharpness in the finished drink.

Ingredients

  • A big bag of apples - the more the better - maybe 6-10lbs as a minimum. They don’t need to be quality eating ones, as long as they’re not going mouldy.
  • Yeast
  • Pectolase/Pectin Enzyme
  • Water
  • Sugar

Method

Read more...

A Final Feed

Its now officially getting a bit late to be feeding, but I thought I’d risk it since the weather’s stayed good and the bees are still active and flying.

I went to inspect the hives, and saw the following:

Sarah has an undrawn frame on each side of the colony, despite feeding. However they’d started layering up brace comb with honey in it. Since they’ll not draw and use this now in time for winter, they’re finished with taking down food.

Rebecca is full of very active bees, and had only half a side of a frame left empty on each side. As a result (and because the bees are very numerous/active) I’ve given them a good feeding.

Tess is a weaker colony in terms of numbers, but they appear to have filled down the outside frames, so don’t need any more feeding.

I’ll take the empty feeder off Rebecca next week, fit mouseguards and put on soaked sugar bags some time later in the year i case they need them.

Read more...

Winter Feeding pt II

Went back today to feed the other 2 colonies - what with being off work moving house I’ve not been able to get to them sooner. however the weather has been glorious this week, and they seem to still be covered in Himalayan Balsam, and there are still a few drones floating around, so they’re not settling down just yet.

Took the feeder off Rebecca, which was empty (apart from a small amount which had run to the wrong end as it sloped uphill). A quick look showed that they’d filled all but the outer side of the outside frames, so one more light feed should be more than enough for them to be stocked up for winter.

Tess is still quite low on bee numbers, but they’re covering 5-6 frames, so might make it through. They’ve drawn all the frames, but there’s no stores in the 4 outer frames (2 at each end) so they’ll need a few feedings to get enough laid down.

Sarah is full of bees, but like Tess, has empty frames at the edge. I’m more confident that they’ll take it down faster though.

So thats 2kg of sugar into each of Sarah and Tess today - I’ll top them up with another 2kg each towards the middle of next week, and maybe another 1-2kg into Rebecca, just in case they need it. Then it’ll be time for mouseguards and sugar bags and a close-up for winter!

Read more...

Winter Feeding pt I

Went up to see the bees today, armed with a limited amount of 2:1 syrup (2 parts sugar to 1 boiling water). I decided to feed Rebecca because a) She’s the most active, and thus most likely to take it down quickly and b) she’s the easiest to get into :)

The syrup had 3kg of sugar in it, so hopefully this will give them a good amount to feed on.

Read more...

No Autumn yet...

Went to the apiary today (the first dry and calm day in a long while) to give the bees a once-over.

I was expecting them to have rampaged through their hives out of control, building brace comb everywhere and other annoying things, but they’d all been remarkably well behaved.

Rebecca and Sarah are both doing well - with Rebecca slightly ahead (as a full split, rather than a brought-on nuc). Both have at least 6-8 frames worth of brood, stores etc, and are still bringing in lots of pollen and honey from the Himalayan Balsam which seems to want to keep flowering in the area. Both hives still had drones in abundance, meaning they’re not settling down for Autumn just yet.

I also took the opportunity to rehouse a nuc (one from another split from one of Cleo’s descendants) into a full hive, with a view to moving them to a new site on the apiary. As is now my tradition, these bees will be named beginning with a ‘T’ - so Tess!

Read more...