A Beekeeper Again!

Luckily I didn’t have long to wait to get hold of bees again, thanks to Faye’s extremely successful over-wintering of her colony.On Saturday, with the final group of EMBA beginners, we performed a Pagden swarm on Cleo. All the brood frames, and most of the bees were put into the hive that had previously held Poly, with the old queen and empty frames being left on Cleo’s site. The flying bees should return home to keep the queen company, and be convinced by the lack of brood that they’ve swarmed. I get to try to bring on a new queen and take care of this new colony! They’d helpfully already got a queen cell lined up with a grub and royal jelly in it, so hopefully I won’t have long to wait.

Now I just have to give them a feed to keep them going until they start foraging properly, and think about marking the queen once she;s up and laying (all of which relies on some good weather!).

It also looks like we’ll get 2 successful nucs out of our earlier split of Cleo, with a ‘maybe’ for a 3rd one, so we’ll be back on target with 3-4 hives going into winter… much better than last year!

Now all I need to do is see how my new colony turns out, and give them a name… I think I’ll keep going up the alphabet and this time choose Rebecca!

Read more...

Dandelion Wine

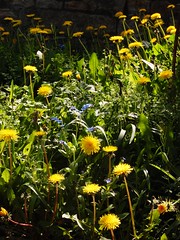
Summer seems to be finally arriving here, and with it a proliferation of dandelions - millions of little yellow heads covering all the fields, verges and embankments in the area. As a result its time to make some dandelion wine!

Dandelions
You need a sunny day for this - the sunshine opens all the heads fully, and you don’t want to pick unopened heads. Pick a shopping bag (4 x 1 pint measuring jugs) full of flowers, taking as little of the stem as you can. Some purists insist that you only use the yellow parts, and discard the green parts of the flower, but I think this is a little excessive - the greenery adds a certain ‘bite’ to the wine.

Once you’ve picked the flowers, you’ll want to make wine as soon as possible - if you leave the flowers to wilt they close up and turn bitter.

Read more...

End of the line

Today was the end of my last hive - Poly had finally had her day.It was the first of the beginner’s classes, so to begin with we showed them Poly, as an example of a weak hive that’s failed to come through winter particularly well. When opened up there were around 100-200 bees, the queen, 30 capped brood cells (some with dead half-emerged bees), 6 larvae and no sign of eggs. This is obviously not enough to keep them going, and the dead emerging bees indicates the workforce has been too small to allow the colony to expand. I did the only option available - took out and killed the queen (never a nice thing to have to do) and shook out and sealed up the hive so its now empty.

The other hive on site is however bursting to the seams with bees, and will probably want to swarm some time in the next 2-3 weeks (we’re already bringing on one nuc from it, with more planned). After inspecting it there were signs that some of the bees from Poly had been attracted to it (probably from the nasonov scenting of the air by its workers at the door), so hopefully some of them will end their days in a slightly happier way.

Of course now I have to put all my efforts into helping along these other colonies if I’m to continue being a beekeeper!

Read more...

Noyau - Beech Leaf Gin

Its that time of year again in Scotland when the beech trees have unfolded their little bundles of leaves, and the light is shining through them - summer is definitely on the way!

Beech Hedge

At this time I always try to make a big batch of beech leaf gin, otherwise known as noyaux - a French word meaning a nut liqueur. Its easy and simple to make, tastes amazing and I always run out well before next summer - leaving me wishing I’d made more the year before!

The recipe is incredibly simple:

Read more...

Come along now girls...

I’ve had 2 inspections since feeding the bees - and in both cases I’ve been a little worried, though perhaps prematurely.On the first inspection, there was a tiny patch of brood - maybe a fifth of a side of a frame - with larvae and capped brood. On the second inspection (today, about a week later) this was the same - still signs of larvae and capped brood, but no obvious signs of eggs.

The number of bees is low (maybe enough to cover 3 frame sides) so I’m worried that either the queen isn’t able to lay at all, or she’s not laying much due to the cold nights, and the forthcoming brood will be too late to replace the winter bees who are dying off.

There’s not a lot I can do right now (the bees are foraging, have stores and pollen, and aren’t really touching the syrup in the feeder), so I just have to wait and see if warmer temperatures will spur on more egg laying, or if the colony is gradually on its way out. I’ll check back in 2 weeks and see what its looking like.

Worst case scenario I have to help focus efforts on dividing the other hive on site to get enough nucs out to get them through the winter.

Read more...

Finally! Spring Feeding

After a frantic 2 weeks of watching the weather, I finally managed to get to the apiary and feed the bees!Its either been windy and sunny, still and rainy, foggy, or gales, sleet,snow and rain, so I’d been avoiding going up to see them in case they all blew or washed away! However, it seemed nice enough today (and with bad weather forecast for the weekend).

Put 5l of 1:1 syrup on Poly, in the new [jumbo rapid feeder](https://secure.thorne.co.uk/popup/health23.htm “” ) from Thornes, which looks pretty decent (having first drilled a hole in the crownboard to accommodate this new feeder). Within a few seconds the bees were up in the feed cone having a nosy (presumably because I had to take off the sugar bags which they’d previously been feeding on, so they knew something was different). They’d taken down about a third of each sugar bag, so I’m happy to say they must have done well with their own stores over winter.

The cluster was looking quite small, but due to the cold they were well pushed down between the frames, so its difficult to know how big a ball they actually are.

I also took off the mouseguard and swept the doorway of the usual collection of dead bees. Here’s hoping that spring finally arrives and I’ll get a chance later this month to have a proper inspection and look for eggs and larvae!

Todo

Extract the honey from last year’s supers

Top up feeder if its all taken down

Check for egg-laying queen

Read more...

Multiple File Downloads in Pure Python

I was playing around with a way to get a number of files from a webserver in Python automatically (ala wget), and came up with the following script. It parses the HTML returned by a web page, looks for all a href tags for files ending with a given extension, then returns these filenames as a list. The rest script then steps through this list, getting each file in turn into a specified target folder.

Read more...

Vinegar Black - Medieval Leather Colouring

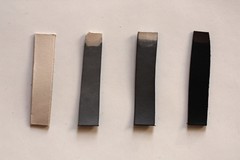
Test Strips: Raw; Vinegar Black; VB, then Soda; VB, Soda then Neatsfoot Oil

Vinegar black is an ancient technique for turning leather a dark grey or black colour. It was almost certainly discovered accidentally when iron was left to stand on leather, leaving black marks, but has been used by hobbyists and professional leather dyers ever since.

Vinegar black (or vinegaroon, as it was known in the Mid-West) is a simple affair - iron dissolved in vinegar is brushed on to leather, turning it black. The iron and vinegar react to make ferric acetate, which in turn reacts with the natural tannins in the leather to give a permanent black stain. As such it isn’t a dye, but a chemical reaction which is permanently bound with the leather. Of course, this means it will only work with vegetable tanned leather, which is rich in tannins. It does give off some particularly nasty smells during the reaction, but the neutralising process and a good airing removes this from the leather.

This process will of course only work on naturally tanned leather - also known as ‘veg tan’ - and not on any other chemically tanned or dyed leathers.

Recipe

2 litres White Vinegar
4-5 wads wire wool, or rusty metal nails

Half fill a jar with wire wool or other rusty metal, pour on vinegar to cover and close up the container - don’t seal it though as it can give off some gas which might make it expode!. Leave in a warm place for a week, until the liquid turns a brown tea-like colour.

Usage

Strain off the liquid to remove any small metal particles. Apply the liquid to veg-tan leather with a paintbrush, applying repeated coats if a darker colour is required. You can dip the leather in the liquid if its easier, but don’t soak it, as this may cause the leather to soften and change shape.

Wipe down with a wet cloth to remove any excess liquid, then neutralise. Only neutralise once the leather is about the right shade of black.

Neutralising

Mix 3tbsp of Bicarbonate of Soda (Baking Soda) with 1 litre of warm water. Brush on, or dip the leather in this solution - it may fizz slightly as the soda neutralises the vinegar.

Once complete, rinse well or immerse in fresh water to remove any remaining traces of vinegar or soda from the leather, which could continue to eat away at the leather and cause damage.

The leather may still have a slight smell of vinegar, but this will disappear with time, especially once the leather has dried completely.

When dry you should treat the leather with some kind of oil to prevent it becoming dry and brittle, which can happen in some cases as the treatment can strip some of the natural oils out of the leather.

Read more...

Making a Simple Leather Shoe

One of the many leather projects I’ve been working on is shoe-making, and I thought I’d post up a quick ‘howto’ on the process involved. Once I’ve finished this project I’ll edit this post to include some photos of the process.

This does of course assume that you have some basic knowledge of leatherworking - if not then I can heartily recommend The Leatherworking Handbook by Valerie Michael as an excellent starting point.

General Advice

Read more...

Nosema and Microscopy

After the sad news of Heather’s demise, I was naturally worried that nosema might be the cause of the hive death and the dysentery. so I decided to do some investigation.Having tracked down a microscope and an assistant, I set about looking at the guts of a sample of bees (around 50) at 400x magnification. After an hour of perusing fascinating slides, I decided that there was no sign of any nosema spores. While this was a good thing, it still left the question - what caused the dysentery and hive collapse?

We spent an afternoon cleaning out the hive, disposing of the dead bees and washing the equipment in a mild bleach and vinegar solution. During this task, we discovered that many of the frames of stores had mould growing over the bees and uncapped honey cells. This indicates that the bees hadn’t managed to store and dehydrate their honey (and sugar syrup) enough, allowing microbial growth, which later took place in the bees, causing the dysentery. The guts of the bees had been brown and sticky when examined, further suggesting this cause.

A second queen cell was also found, indicating that the last supersedure obviously hadn’t taken, and so the chances are that the colony both had too few bees to maintain enough heat over winter, and also would have had an unfertilised queen coming into the spring. So while it was depressing to see them die off, their chances were bleak anyway.

Now that the equipment is all sterilised, I can focus on building up Poly again and swarming her back to 2 colonies in the summer.

Read more...